For the gluten-free crust:
2¼ cups Bob’s Red Mill Gluten Free 1-to-1 Baking Flour, plus more for rolling out dough
1 Tbs. granulated sugar
1/4 tsp. fine sea salt
6 oz. unsalted butter, cut in 1/2-inch cubes and kept cold
1/2 cup ice-cold water
For the apple filling:
1/4 cup granulated sugar
2 Tbs. light brown sugar
1 Tbs. cornstarch
1/2 tsp. ground cinnamon
1/2 tsp. ground ginger
Pinch nutmeg
Pinch fine sea salt
2 lbs. Honeycrisp apples
2 Tbs. fresh lemon juice
For the crust:
In the bowl of a stand mixer fitted with the paddle attachment, combine the flour, sugar, and salt. Add the butter to the bowl and mix on low speed until the dough starts to clump together and the butter cubes are pea-sized.
Add water just until the dough comes together and forms a ball. Tip it out onto a floured surface and pat it into a disk about the size of your hand. Wrap it in plastic and refrigerate for one hour, or until the dough is firm but still pliable. At this point, the pie dough can be tightly wrapped in plastic wrap and refrigerated for up to five days or frozen for up to three months. If frozen, thaw in the refrigerator.
Sprinkle a small handful of flour over the work surface. Unwrap the disk of dough, place it on the floured surface, and sprinkle lightly with flour. Starting from the middle and working your way to almost the edge, roll out the dough to form a circle. Turn it 90 degrees and repeat, sprinkling flour under and on top, as needed. Be mindful of not going past the edge of the dough with your rolling pin to ensure the edges are the same thickness as the center. For a nine-inch shallow tart pan with a removable bottom, roll out the dough until the diameter is at least 12 inches and the thickness is no thinner than 1/4-inch.
Gently roll the dough over your floured rolling pin and unroll it into the tart pan. Lightly press the dough into the bottom edge of the tart pan and up the sides. Roll your rolling pin over the top edges of the tart pan, thereby cutting off the excess dough. Discard the trimmings or save them for baking separately. Transfer the pie shell to the freezer for 15 minutes.
Preheat the oven to 325°F.
Because the dough is gluten-free, the bottom will not puff up much. But for extra security, you can use dried beans or pie weights. Prick the bottom with a fork. Line the inside of the crust with foil and fill it with dried beans or pie weights.
Bake it for 15 minutes, remove the foil and weights, and bake for another five minutes. The crust should be lightly golden, like the color of a latte. Cool completely before adding the filling. The par-baked crust can be baked up to two days in advance, covered tightly, and held at room temperature.
For the filling:
Preheat the oven to 350°F.
Combine the granulated sugar, brown sugar, cornstarch, cinnamon, ginger, nutmeg, and salt and whisk together.
Divide each apple into four wedges and remove the cores. Cut the wedges into thin slices about 1/8-inch thick. (Using a mandolin would make this easier.) Immediately toss the slices with the lemon juice to prevent browning. Sprinkle the sugar mixture over them and toss to combine.
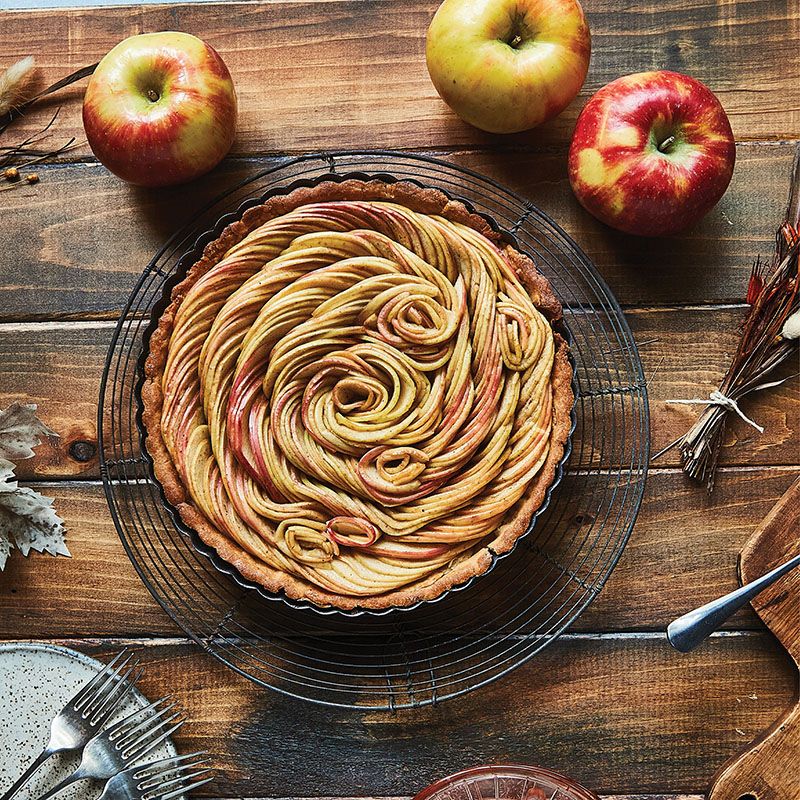
Start shingling the apple slices at the outer edge of the tart pan and overlap them halfway over the previous slice to resemble flower petals, curved peel side up. Continue to shingle the slices, packing them tightly, until the very middle of the tart. To form the small flower for the center, wrap several apple slices around each other as tightly as possible without breaking them and tuck it into the center of the spiral. (Flowers can also be made if there are gaps in the petals, as seen in the photo.)
Bake the pie for 30 to 35 minutes, or until the filling is bubbly and the edges of the crust are golden brown. If edges of the crust or the tops of the apple slices start to darken before the pie is done, lightly cover the pie with foil and continue baking. Cool completely before serving.
Chef’s Notes: “On serving day, bake this pie in the morning and hold it at room temperature, covered. By allowing it to set up, it holds together better when cut. Serve at room temperature or slightly warmed in a 250°F oven for 10 to 15 minutes. Any leftovers can be tightly wrapped and stored in the refrigerator for up to a week.”
Butcher & Bee
1085 Morrison Dr.
(843) 619-0202
butcherandbee.com